-
Login to your Blogger account.
-
From the Dashboard screen, on the left side you’ll see a green plus sign with "New Post" next to it. Click that button to directly go to creating a new post.
-
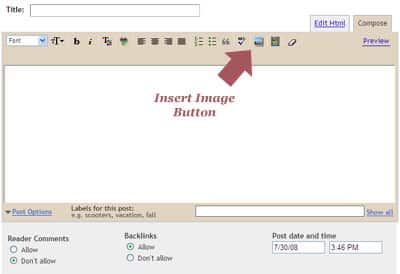
The next thing you will see is the screen image above where you will now enter text, images and parts of your new post.
-
TITLE: This is the "heading" for your blog post. It should be descriptive but not too lengthy.
-
BODY: The text of your post. Use the toolbar for formatting your text (such as making some text bold, italicized, or changing the color of your text). Also on the toolbar you can choose to insert an image.
INSERTING AN IMAGE:
Click the Add Image button on your toolbar, denoted in the image above, and to the right of the ABC Spell Checker button.
At the top you can click the Browse button to upload and use an image stored on your computer (such as a picture of a project you just downloaded from your digital camera); or you can use an image’s URL (or link) if you have an image online on Split Coast Stampers for example or other public photo gallery.
Choose a layout for your image (the alignment).
Choose a size.
Blogger always tells you how much of your image space you are currently using.
When ready, click Upload Image and the image will appear in the message body.
-
-
POST OPTIONS: Click the blue link called Post Options to control "comments" and "backlinks" (to allow them or not).
-
LABELS:
This is a very IMPORTANT part of a new post, of any post that you later want "categorized." Meaning, if you want your visitors to be able to quickly view all your "tutorials" or all of your "cards" or all of your "specials" then you want to use Labels with your post.
So, if your post is an image of a recent card you created using the Baroque Motifs stampset, in the Labels are you may use the label "Cards" and "Baroque Motifs." You would then enter "Cards, Baroque Motifs."
-
SAVE NOW:
Blogger automatically begins saving "draft" copies of your post until you finalize it with Publish Post. However, you can click Save Now anytime you like as you are developing your post so you don’t accidentally loose your work if the internet goes down or your computer shuts down unexpectedly.
-
PUBLISH POST: Posts your new post to your blog.
Here are some Blogger Help files as well:
* How to post: http://help.blogger.com/bin/answer.py?hl=en&answer=41378
* Using Labels: http://help.blogger.com/bin/answer.py?hl=en&answer=44498
* Arranging Page Elements and adding a new Page Element: http://help.blogger.com/bin/answer.py?answer=43708

