Although many demonstrators use Photoshop Elements to create a watermark, here is a tutorial in Photoshop. I have an older version, Photoshop 7.0, but I'm sure there are similar steps and features in Photoshop CS versions since basically we just use the Text tool and Layer Effects such as Drop Shadow.
Okay, let's get started.
- Open Photoshop.
-
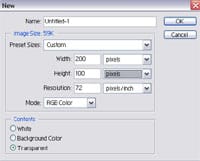
Create a new file. In the dialog box that opens, set a Width and Height. In this example, I set the Width to 200 pixels, Height to 100 pixels, and Contents to Transparent.
-
Pick a color in the Foreground color. In this example, the color is red. The foreground/background color is towards the bottom of the toolbar. Here, the foreground is red, the background is gray. To change the color you want to test with, click on the foreground color and the Color Picker will appear and you can choose another color. Again it is for testing purposes. In the end, the background will be transparent in a watermark.
-
Since I normally create watermarks with a white font color, for now I want to fill the background with the foreground color. Go to the Edit Menu, choose Fill, leave the default as Foreground Color and then click OK.
-
Click the Text tool and make sure the font color is white (in this example). Many people use gray but I like to use white. To change the font color to white, change the foreground color to white (click on the Red box and choose white or enter the value #FFFFFF, click OK).
-
From the toolbar, choose a desired font and size. Then click on your document and begin typing. At any time you can select the text (as you would select text in MS Word) and change the font or font size, as well as resize the text box (go to any corner and when you see diagonal arrows drag to expand the box if necessary).
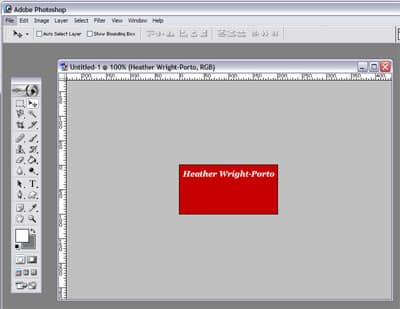
Notice the Text toolbar at the top where you can select font, font size, color, and if you would like it bold and/or italic as well. In this example, my name is bold and italicized, font is Georgia, and size is 16.
- I then hit the Enter to go to the next line, changed the font size to 10, made it just bold (instead of bold and italic). Hit Enter again and create the second smaller line so the end result so far looks like this:
- From the bottom of the Layers Menu, now we'll add the Drop Shadow effect. If you don't see the Layers Menu go to the Windows Menu and choose Layers.
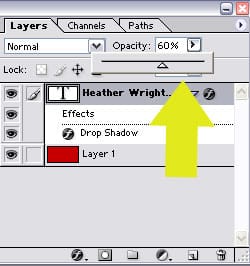
At the bottom of the Layers Menu, click the little circle that looks like the "f" (where the yellow arrow is) and this menu will appear below. Click Drop Shadow. Then from the Layer Styles box that pops-up just Click OK (unless you want to experiment).
- Here is the final sample.
- We now need to reduce its opacity to make it more transparent but still to show. So, from the Layers menu, click the Opacity drop down which is now 100% and set it to 60%.
Then notice the change in the sample:
You can play with the Opacity setting and select the value that is right for you!
- The last thing to do now is to make the background transparent, now that we know what it will look like on a sample.
- From the Layers Menu, click on Layer 1 so it is highlighted. We have been working in the Text tool, but now we need to switch to the other layer, Layer 1.
- From the Edit Menu choose Select All. This selects the entire background, all the red.
- Then, click the Delete key and it's gone and all that is left is the transparent background and the text.
- Now, we just have to save the file as a PNG format so the transparency is preserved and it can be added to any artwork image. Go to the File Menu, choose Save For Web, and from the Settings or available formats choose PNG-24. Click Save. Then give the file a name such as HeatherWatermark.png and click Save.
- You're created your watermark!
To put your watermark on your artwork, you can use the following FREE programs and tutorials:
- https://www.blogsbyheather.com/2008/11/iwatermark-for-the-mac-free-watermark-program.html
- https://www.blogsbyheather.com/2008/10/free-image-resizing-and-watermark-program.html
To view other Image Editing topics, visit: https://www.blogsbyheather.com/image_editing/
Hope you had fun!


What photoshop program is the best to use for changing facial features? i want to download it. please let me know what is the best one. I want to change the appearance of my face especially my nose lol
Thats was really awesome… Thanks a lot for sharing this handy technique!
Many thanks for this way of creating a watermark, I use two other styles, one is a brush I have created as a watermark brush, that I use in a similar way to you here, the other is a method using a patern layer, that covers the whole image (a bit more distructive but even harder to remove). I have a tutorial for creating the 2nd method if it is ok to post: http://www.fatphotographer.net/links/how_to_post_process/photoshop_-_creating_a_water_mark_.html
I read and tried 3 other tutorials before this one and could not create a decent watermark. Thank you!
Hi Lorelei,
I’m so happy it worked for you and thank you for dropping a note!!!
Best wishes and happy blogging!
thank you soo much for being so detailed and simple to understand!!
I just stumbled into your blog and I have wanted to watermark my photos that I post on the Web for sometime now. You have made it Soooo easy! Thank you very much for the tutorial.