
With new formatting, it's hard to share HTML code inside a post at times, so I saved the code documented in this post as an image (you'll see below in Modifying and Understanding the Code), and you may also download the code in this text file here.
The first thing you need to do is create or have some create a button (a logo) for you to use as a "badge" (button) to share in your sidebar. Then, you need to store it!
Uploading an Image for your Button
Photobucket is a very popular image storage site, easy to use and free, www.photobucket.com.
- After uploading an image to photobucket and saving it.
- You can then put your mouse pointer over the image and select and copy the Direct Link.
- That is what you will use for hte SRC.
Blogger has a image storage manager called Picasa Web Albums where you can upload an image to your album and then click the image to then get a link to the image on the right side. However, for Blogger bloggers I think the use of Photobucket is much easier.
Those who have Typepad and WordPress have File Managers.
- Typepad users: Go to Library, File Manager. Browse to select an image to upload. Click Upload. When you see the image in your File Manager on the left side, right-click on it and Copy Shortcut (or Copy Link). That is what you will use for SRC.
- WordPress users: Go to Media Library, Add New. Select and upload a file from your computer. Afterwords a window appears with the Link/URL at the bottom. Selec and copy that URL. You will use that as your SRC.
So before you even start you need to upload or store the image (your button) "somewhere."
Modifying and Understanding the Code
You will modify the HREF and the SRC to:
- HREF: the location of your blog/website and
- SRC: the location of the image you are using as your button.

Grab My Button HTML Code.
Remember you can get the TEXT file here.
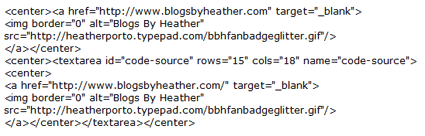
The first part of this HTML code above actually displays the button in the sidebar (centered)
<center><a href="https://www.blogsbyheather.com/" target="_blank">
<img border="0" alt="Blogs By Heather" src="http://i493.photobucket.com/albums/rr300/blogsbyheather/BlogsByHeatherBadge.png"/></a></center>
You would then replace the HREF value with the URL of your blog! And paste in the link to the image you just uploaded to Photobucket, your TypePad file manager or WordPress media library in the SRC.
I have highlighted the two areas above to help you identify the HREF and the SRC values that need to be replaced with yours!

Then you'll notice another area starting with <center><textarea…..> and ending in </textarea></center>. That code centers and the TEXTAREA allows you to display code in a text box in your sidebar.
Then, you will notice, inside those tags is the same exact code you used before in centering the image on your own sidebar.
<center><a href="https://www.blogsbyheather.com/" target="_blank">
<img border="0" alt="Blogs By Heather" src="http://i493.photobucket.com/albums/rr300/blogsbyheather/BlogsByHeatherBadge.png"/></a></center>
So yes, it's the same code twice!!! But one set of the code sits inside the TEXTAREA tags so it can be seen as HTML in a text box in your sidebar. Visitors can then copy and paste the html code into their blogs using this tutorial.
Best wishes,
Heather Wright-Porto
www.BlogsByHeather.com
Thank you so much! I was wondering if I can leave out the part
img border=”o” alt=blogs by heather….
and just have img src=”my picture url”
Thanks!
I’ve been wondering how to do this!! Thank you so much–this is great information. Your posts are always so helpful. Have a great day.
@Laurie Wilson- don’t leave out the ‘alt’ tag… just change the information in it.
The ‘alt’ tag is used to “describe” an image to those who can not see the image. The most important function of an ALT tag is to explain to a blind user what an image is displaying.
Search engine crawlers also use ALT tags to decipher what an image is or what it is representing. It should be an accurate description of what the image represents, and more important, it is required for the HTML to be valid.
thanks so much! this was a perfect tutorial!
Yahoo! Worked great! Thank you SOOOO much! 🙂