
In a recent newsletter, I shared this tutorial on LinkWithin. Be sure to sign up fo rmy newsletter so you get tutorials that are exclusive to newsletter subscribers or ones, such as this, that you receive before anyone else!
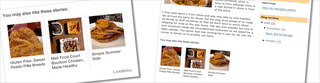
By popular demand, below are instructions on how to install the LinkWithin widget. It's the "You may also like these…" widget (normally 3 photos) you see at the bottom of other people's posts.

LinkWithin – Related Posts Widget
Whether you using Blogger, Typepad, or WordPress.org (WordPress.com blogs cannot install this widget), this tutorial is for you and comes highly requested – it's a popular widget to have for you blog and actually helps your visitors find other, related articles of interest. This keeps them on your blog longer and increases the number of clicks on your blog. You want to keep your visitors happy (smiley).

- Go to www.LinkWithin.com.
- Enter EMAIL.
- Enter your BLOG URL (the real address such as mine is http://heatherporto.blogspot.com. Do not enter a domain as it will say it's an invalid URL, http://www.HandStampedByHeather.com.
- Select your PLATFORM, such as Blogger for my site, this example.
- Select number of STORIES, default is 3.
- Then click GET WIDGET.
- It's that easy!!!!
BLOGGER
When I clicked GET WIDGET I got this page (below) and then click INSTALL WIDGET at the top so it would open my Blogger Account.

On my blog (my personal, stamping, fun blog: www.HandStampedByHeather.com, it now has the widget added. When I wrote this article originallay, the snapsoht below was at the bottom of my most recent post where I am displaying pages of a BELIEVE holiday chipboard album.

TYPEPAD
For Typepad, you complete the initial form above with your email, blog URL, etc. Then when you click GET WIDGET you come to this screen, where when you click the INSTALL WIDGET button, you will be prompted to login to Typepad (if you are not already) to complete the installation.

WORDPRESS
For WordPress users, only those using the self-hosted WordPress blogs can add this widget, those who use www.WordPress.ORG (not www.WordPress.COM).
I hope you enjoyed the tutorial. Again, remember to sign up for my newsletter for exclusive tutorials or just to be the first to know about new services, new features, and new tutorials before anyone else!
Be sure to check out this post/tutorial on Mr. Linky in case you missed it!
Heather Wright-Porto
www.BlogsByHeather.com
Thank you sooooo much for posting this information. I have always wondered how to do this & I love it!! A new follower since the first of the year.
Thanks for the tutorial, was easy as pie to add!
Just installed LinkWithin – I have a colored background with white type so I’m waiting to see how it will look : D Thanks for the tip!
thanks for your tutorial,it is very useful thakns again
Thank you for this information! It was so easy to follow. I appreciate your time to post this.
thanks for posting this but i do have an error when i click the widget – it says “blog not found” asking me to register. I believe this is due to the change of URL address I did recently.
(from chelalpuerto to iamchasingcolours.blogspot.com)
Would you be able to help me on this?
Thanks !
Thank you so much for this little tutorial. Very helpful and was so simple to follow!
Great tut thanks….although I feel like it’s highlighted that I need to get my photography sorted and a more high quality as I don’t like the look of the pics in the small boxes…but that’s a work in progress 🙂
thanks SO much!
Thank you so much! I was worried it would be complicated ~ Thanks for sharing
Thanks a lot for so clear explanation…It’s working.:)
Thanks so much, just done it and it works a treat! x
thanks for the information..:)
I’ve been searching so long to know how to do this ! Thank you very much, I really like the add !
Thx very much, it’s helpful.