As you continue to blog, your list may grow so quickly that it may take up so much room in your sidebar that it may not be so easy for your customers/visitors to find what they are looking for.
In the past Reorganize Your Blog SERIES post, we reviewd a few ways you can create dropdowns in your blog. In this post we are going to expand on the idea of creating and using multiple dropdown boxes in your sidebar to link to pages or specific categories on your site.
This requires manually writing HTML code. Although I am sharing the instructions here you may be the type of person who wants to watch, listen and learn. This will be taught in my upcoming HTML for Bloggers Webinar – so you'll be able to watch me live or watch and listen to the recordings at your leisure!
Okay, so lets' get started! I'm going to use my stamping blog as an example but you can use this technique for any business and to split up your categories into different dropdown boxes like Renee Blodgett does at Down The Avenue (www.DownTheAvenue.com). I revamped her blog over a year ago where she had a bunch of TypeLists and Categories taking up lots of room in her sidebars. We converted them all to dropdown lists and created a nicer, neater and more organized sidebars.
Step 1: View the list (long list) of categories
On my stamping blog, www.HandStampedByHeather.com, I have a huge list of categories labeled by stamp set, technique, wheels for example (see snippet on the left here). This list is quite large and takes up a lot of room.
Step 2: Determine how you would like to break them up.
So what I would like to do is create a few dropdown menus in the sidebar and break up the categories. I would like to create one dropdown labeled "Select By Stamp Set" and another "Select By Technique" and so; but those are the two we will use in this example.
Step 3: Create a sidebar item to support HTML code.
In order to accomplish this you must keep the long lost visible on your site, as you need to copy the link location of each category/label. It doesn't matter if you're using Blogger, TypePad or WordPress, the steps are the same but the sidebar gadgets are named as follows.
- In Blogger you will add a HTML/JavaScript gadget for each dropdown you're creataing.
- In TypePad you will create a new TypeList (NOTES Type) for each dropdown.
- In WordPress you will use a Text Widget for each dropdown you are creating.
In my example I am creating an HTML/JavaScript in Blogger with the Title "Select By Stamp Set". The important part you need is below in creating the HTML code for the dropdown list(s).
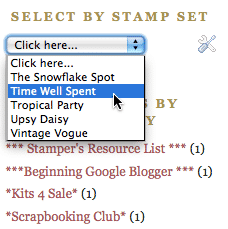
You will see in these lines of code the VALUE propert is being assigned the hyperlink (link location) of the category. In the long list, I right-click the category, such as The Snowflake Spot, and choose Copy Link Location (or Copy Shortcut). Then I go to my HTML/JavaScript code gadget and paste it into the VALUE property for that item. Then notice just the text The Snowflake Spot in between the OPTION tags. That is the text the user sees in the dropdown box (highlighted below).
In my sample HTML/JavaScript gadget I currently have this code:
<html>
<body>
<form>
<select onchange='location=this.value;'>
<option value=http://www.handstampedbyheather.com>Click here…</option>
<option value=http://www.handstampedbyheather.com/search/label/STAMPSET-The%20Snowflake%20Spot>
The Snowflake Spot</option>
<option value=http://www.handstampedbyheather.com/search/label/STAMPSET-Time%20Well%20Spent>
Time Well Spent</option>
</select>
<option value=http://www.handstampedbyheather.com/search/label/STAMPSET-Tropical%20Party>
Tropical Party</option>
</select>
<option value=http://www.handstampedbyheather.com/search/label/STAMPSET-Upsy%20Daisy>
Upsy Daisy</option>
<option value=http://www.handstampedbyheather.com/search/label/STAMPSET-Vintage%20Vogue>
Vintage Vogue</option>
</select></form>
</body>
</html>
And when saved it looks like this in the sidbar (see snapshots below – one with it as is and one with the box expanded so you can see the items in the dropdown).
And when you click on an item it go to that category – meaning it filters the posts and displays only those posts with the label/category you selected (Time Well Spent in this example, snapshot of my blog seen below).
Next, you would create another HTML/JavaScript Gadget (Blogger), NOTES TypeList (TypePad) or Text Widget (WordPress) for your next topic. For my stamping blog, for example, I would create another one for Techniques (Select By Technique).
Here is the HTML code:
<html>
<body>
<form>
<select onchange='location=this.value;'>
<option value=http://www.handstampedbyheather.com>Click here…</option>
<option value=http://www.handstampedbyheather.com/search/label/TECHNIQUE-Bleach%20Out>
Bleach Out</option>
<option value=http://www.handstampedbyheather.com/search/label/TECHNIQUE-Boxes>
Boxes</option>
</select>
<option value=http://www.handstampedbyheather.com/search/label/TECHNIQUE-Brayer>
Brayer</option>
</select>
<option value=http://www.handstampedbyheather.com/search/label/TECHNIQUE-Crayon%20Resist>
Crayon Resist</option>
<option value=http://www.handstampedbyheather.com/search/label/TECHNIQUE-Dahlia%20Flower>
Dahlia Flower</option>
</select></form>
</body>
</html>
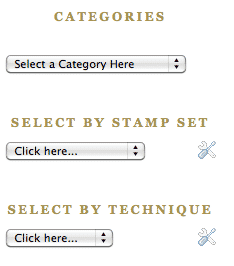
The results would now be 3 dropdowns in the sidebar for Categories;
- one that shows all the categories
- one for selecting by stamp set
- one for selecting by technique

(You only see the wrenches as I am logged into to Blogger and working on the blog. They will not be visible to customers.)
Lastly I would then remove the Labels gadget/ Categories gadget (the long list) as once you have all your dropdowns completed, you no longer need to show this large list which is cluttering your sidebars!
Additional notes
You can use this same method to link to categories (as discussed in this artlcle), other pages on your own blog, posts or pages on another person's blog or website, etc.
I also like to keep dropdown values alphabetized – makes it easier for your users and customers to find what they are looking for.
Want the dropdown boxes all the same width? We'll learn how to do all of this (dicussed in this article), how to customize the dropdown box further and more HTML coding in my upcoming HTML for Bloggers webinar. Be sure to sign up for my newsletter as they will get the notification of the schedule first. Classes to start in May!
I can help!
Want me to reorganize your blog for you? We still have a few more articles to the Reorganize Your Blog SERIES of posts but in the end if you prefer me just to it for you, then I'd be happy to! Send my your blog address and any notes – if you have specific things you want moved or added or removed, or if you just prefer me to do a clean up and to help you decide.
Contact me for a quote today!
Upcoming Blogs By Heather Articles:
- Webinar Schedule
- How to Claim your blog using Technorati
- More on the Blogging Success Summit SERIES
- and many, many more!
Note: If you are having a specific problem or have an idea for an article? Email me, I'd love to hear from you and I'm sure others have the same question(s)!


Hi Heather,
I am impressed with the creativity of this blog. I was wondering if you could direct me to any tutorials for making a drop-down menu using Blogger. I am also just wondering the best way to display posts? Is a drop-down menu the best form of navigation, or is there something better?
Hi David!
Yes, you can create a dropdown menu in blogger 😀
I have one on my personal blog, http://www.HandStampedByHeather.com; and believe it or not used this Typepad code to get it started:
http://help.typepad.com/drop_down_menus.html
best wishes 😀
Heather