In my previous Pinterest article on "How to add the 'Pin It' button to the bottom or youf blog posts", we discussed how to add the Pin It button to your blog (the share button that allows your blog visitors to easily and quickly "pin" their favorite items in your blog posts). However, a few questions have come in and I think they are great questions and good points to discuss with all of you!
- Where does the Pin-It button link to?
- IMPORTANT read if you are using TypePad and have custom links in your Nav Bar already and want to add the Pin-It button.
- Using TypePad Advanced Templates? Then you can add the Pin-It button as well in individual posts (read on).
Where on my blog does the "pin" link to?
It depends on what page you are in your blog (the URL in the address bar). For example, when I started Pinterest, I searched my own blog, http://www.HandStampedByHeather.com for some artwork to "pin".
For example, I want to pin this cute picture of my daughter Michaela, kissing herself in the mirror and showcasing the Photo Holder card as well.
First, I did a search for the category called "Photo Holders" and shows my posts that have handmade "Photo Holders" in them. This is one of them. However, if I "Pin It" now, it will pin the picture and it will link to the main category "Photo Holders" page.
If you want to Pin It and link to a specific post…
…then you have to click on and open a specific post first!
Notice when I click on the actual post, the URL updates. So now if you "pin" the cute photo of my daughter Michaela, it will go to one post, http://www.handstampedbyheather.com/2008/12/frostysnowflake-photo-holder.html
Keep that in mind when you visit other sites and "pin" their products or artwork. Be sure to click the actual post before "pinning".
READ THIS: If you are adding the "Pin It" to the TypePad Nav Bar
If you have custom links in your TypePad Nav Bar like Monica Weaver does, for example, then you should read this before adding the "Pin It" instructions as you would need to add more HTML code if you plan on keeping the custom links that exist.
Working with Custom Links
Notice, she has Home, About Me, Catalogs, Promotios, etc. These are custom and not the default items TypePad sets such as Home, Profile, Subscribe, Archives, etc. So, if you have TypePad's default items or no Nav Bar at all right now, then follow the instructions here (which were previously posted). Otherwise, you need to write a lot more HTML code! If you don't, and you go switch from Simple to Advanced to add the Pin It button, you lose your custom links and the default Nav Bar options for TypePad show, as well as the newly added Pin It button.
So, if you have custom links and want to add the Pin-It button, you need do the following for each of your custom links.
You need to add a set of <li class="nav-list-item">….</li> for each item on the Nav Bar. In Monica's example, notice how I constructed the list items and hyperlinks with the anchor tags (<a href="">……</a>). Then I highlighted the Pin It button code.
Although the Pin It code is highlighed, all this HTML/CSS code would have to be added in the Advanced area of the built-in Nav Bar area in TypePad (Design->Content->Nav Bar Configuration Window->Advanced). Again, this is a sample showing what I would do for Monica or someone who has custom links and who wants to add the Pin It button.
Click here to view the text file as it's not fitting completely in the post area.
<ul class="nav-list pkg">
<li class="nav-list-item">
<a href="http://www.addalittledazzle.com/my_weblog/">Home</a>
</li>
<li class="nav-list-item">
<a href="http://www.addalittledazzle.com/my_weblog/about-me.html>About Me</a>
</li>
<li class="nav-list-item">
<a href="http://www.addalittledazzle.com/my_weblog/catalogs.html">Catalogs</a>
</li>
<li class="nav-list-item">
<a href="http://www.addalittledazzle.com/my_weblog/promotions.html">Promotions</a>
</li>
<li class="nav-list-item">
<a href="http://www.addalittledazzle.com/my_weblog/workshops.html">Workshops</a>
</li>
<li class="nav-list-item">
<a href="http://www.addalittledazzle.com/my_weblog/stamp-club.html">Stampers Club</a>
</li>
<li class="nav-list-item">
<a href="http://www.addalittledazzle.com/my_weblog/referral-program.html">Customer Care Program</a>
</li>
<li class="nav-list-item">
<a href="http://www.addalittledazzle.com/my_weblog/join-my-team.html">Join My Team</a>
</li>
<li class="nav-list-item">
<a href="http://www.addalittledazzle.com/my_weblog/stamp-club.html">Contact Me</a>
</li>
<li class="last-nav-list-item nav-list-item">
<a href='javascript:void((function()%7Bvar%20e=document.createElement('script');
e.setAttribute('type','text/javascript');e.setAttribute('charset',
'UTF-8');e.setAttribute('src','http://assets.pinterest.com/js/pinmarklet.js
?r='+Math.random()*99999999);document.body.appendChild(e)%7D)());'><img alt='Pin It'
onclick='doPinIt();' src='http://i493.photobucket.com/albums/rr300/blogsbyheather/PinIt.png'
style='margin: 0 0 0 0;'/></a>
</li>
</ul>Remember to click OK.
Then click "Save Changes" to the overall Design area in TypePad.
You're done!
Using TypePad Advanced Templates: Yes, you can add the Pin It button too!
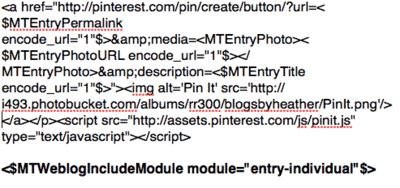
If you are like me and use TypePad's Advanced Templates, you can also add the Pin It button to your posts (individual archives module). Again, I do not advise switching to advanced templates unless there is an absolute need and you are familiar and comfortable using HTML and CSS code. Click here to learn more about Advanced Templates.
Kitchenmage has updated their blog with new code for the Pin-It button for TypePad and I wanted to pass it along to you! Click here to read their tutorial on it.
For me it was slightly different because I converted to Advanced Templates ions ago where things were split and organized better, when they had a "convert to advanced templates" option available. So for me I don't see the $MTEntryBody$ tag that Kitchenmage references. Instead mine is this $MTWeblogIncludeModule module="entry-individual"$.
- From the Dashboard, go to Design.
- Then click on Templates.
- When the templates (modules) appear, choose the Individual Archive
- Look for either of the "Entry" body tags highlighted above and copy this code (click here to view and copy the code).
- See my code below and where I pasted it "above" the Entry body tag.
- Then Save changes.
Your Pin It button will now appear at the top of your post, ONLY when someone clicks on that individual post!
I tried to add it to the Main Index Template in several locations but it crashed and would not show my blog at all and instead said an error has occurred.
Hope this helps clarify a few things…
More Pinterest coming up with how to add the "Follow Me on Pinterest" to the sidebar for Blogger, TypePad, and WordPress.com.
Heather Wright-Porto
www.BlogsByHeather.com


