As promised, here is a tutorial on TypePad's new image editor. I didn't experiment with all of the available tools but those I though you'd enjoy and have fun with, and those most desired – such as Rotating and Adding Text.
You can use the Text Tool as a way of Watermarking your images!
Insert An Image
First, it is important to note that you do NOT see the image editing tools right away. You MUST first INSERT the image into the post (page). THEN double-click on the image to open the Editing Tools!
- Click to insert the image (see image button on toolbar).
- Next, click Choose File to select and image from you computer.
- Once you find the file, choose the image and it will load into the Insert Images window as shown below.
- Then click on Insert Image (bottom right).
- Then it is inserted into your post (or page).
Here is my darling Michaela on her first day of school, September 2011. It inserted this way – sideways.
TypePad's Image Editor
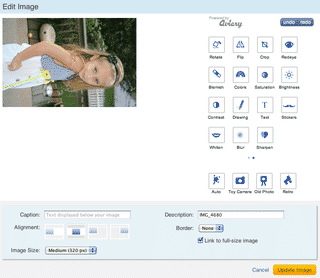
- Then I double-clicked the image to get started and open the image editor. Here is what you will see when it first opens.
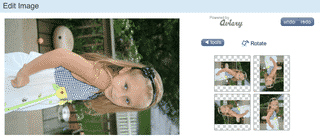
- For me, I obviously have to Rotate it (LOL). So I clicked on the Rotate button and it did prompt me about resizing the image (to be able to use the tools as the image was too large). I said OK.
- Then it brought me to the Rotate tool screen.
- I will choose the one on the bottom, right.
- Then click the Tools button to go back to the other Tools available.
- Then click on click on Old Photo from the bottom right which makes it look vintage. It's a cool tool!
- For me, I then click the Undo to experiment more.
- There are a lot of tools to play with like Red Eye, Contrast, Brightness, etc.
- I then clicked Toy Camera and love the look of it for my Michaela picture.
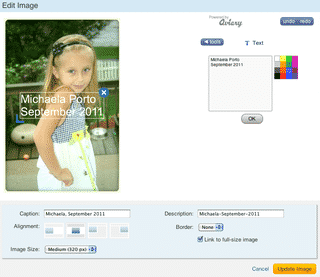
- Next, click the Text button to add some text. This can be used for a way of "watermarking" your images!
- In the text box to the right, add your text and click a color. I used White for my first box. You WILL be able to resize the box and drag it where you want on the picture!
- Click OK and it's added to the picture. Centered. You may want to leave it there for watermarking purposes but I moved mine.
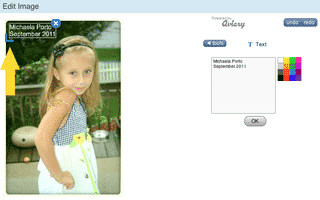
- I dragged on the box, bottom left, to resize and drag to upper left corner.
- Then I added another text box and moved it to the bottom right and vertical.
- To continue editing, click the Tools button again to use other tools.
- Remember you can use the UNDO.
- When you're finished, click the Update Image button in the bottom right.
Here is the image updated after I added all the customizations I wanted for my dear Michaela.
Important Notes
- Ordering does matter. If I added the text, then the Toy Camera tool, it would cover/over some of the text. So in this picture, the Toy Camera was applied first, then the text added.
- Once the image is inserted and you clicked "Update Image", if you then double-click on it again to open the Image Editor, it will continuing editing the "edited" image, not the original. So you may have to simply delete and start over.
- When editing your image it may ask you about resizing to use the editor, that is OK and click to Resize.
- In the upper right corner there are UNDO and REDO buttons you can do when applying tools and experimenting!
- Read more about it here on the Everything Typepad Blog.
Happy blogging!
Heather Wright-Porto
www.BlogsByHeather.com







Thanks for sharing!
I sent your articles links to all my contacts and they all love it including me.
Hi Heather!
I had no idea this was available on Typepad! Thanks so much for the helpful instructions! I will try them out soon….tell your daughter she’s a lovely model!
Merry Christmas to you and your family,
Mitzi