 Do you have a new blog signature that you would like added to every blog post (new or existing)? Then this article is for you! It does involve some HTML and storing an image…but let's give it a try! If not, shoot me over and email and let me know where you get stuck!
Storing Your Post Signature Image
- First, you have to have an image of your signature (for this tutorial), such as mine (displayed above).
- Next, you have to "store" it some place. Maybe you already have a Photobucket account or Flickr or other online place where you store images? You can upload it there and get the Direct URL. If so, skip to the "Going back to Blogger area, step 14 below). No? If not, no problem. We'll use Google Sites! It's free and you don't have to "open" and remember a password for yet another site!
- Login into Blogger, your blog (http://www.blogger.com).
- Then go to http://sites.google.com.
- You may be prompted to login again.
- Next, you want to create a site by clicking the red CREATE button. Note, it will look like you are setting up a free web page but we are using Google Sites for image storage. Let's keep going along….
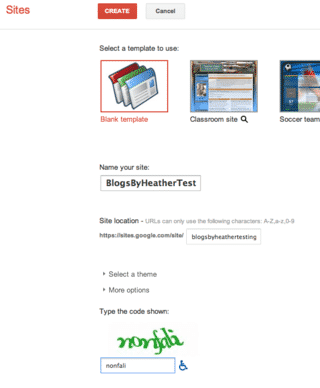
- Complete the information shown in the Create New Site screen.
- It doesn't matter what template you choose as we are just going to be using Google Sites for image storage.
- Complete the info and then click red CREATE SITE button.
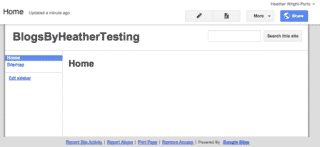
- Next, you'll come to a screen like this (shown below).
- You will do nothing here but go up to the upper right corner, click on More and then Manage Site.
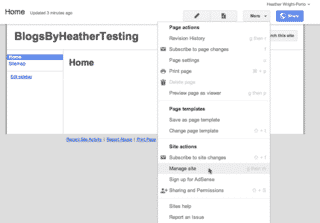
- Then from the left sidebar, click Attachments.
- Click the Upload button at the top and then select the image from your computer to be store in Google Sites.
- Then notice to the right of your newly upload post signature, that you see View/Download.
- Right-click on View and choose Copy Link or Copy Link Location or Copy Shortcut (whatever your browser says – LOL).
Now you are ready to go to Blogger and insert that link and code into HTML code!
- Go to Blogger again http://www.Blogger.com, and to your blog.
- Then go to Design, then Edit HTML or if using the New Blogger Interface, go to Template, Edit HTML, and click Proceed.
- When at the "code", click on Expand Widget Templates check box at the top of the box with all the code in it!
- Then do CTRL+F (find) to find the post-footer-line-1 and then paste this code above it (click image to enlarge the image):
<img src=' paste in the copied link here '/>
NOTE: Use signal quotes. You must have the / at the end before closing the bracket.
-
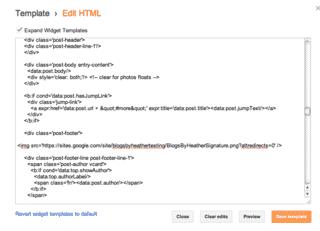 Then remove this part: ?attredirects=0

- And if you want to add "no border" around the image also add the following code style='border:none;' shown here:
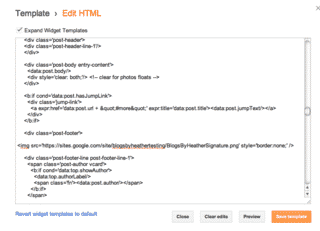
Remember to click images to enlarge the view to better see the code. - Click Preview before you save…
- If it looks good, click Save Template button and you're done!
You're done! Congratulations on using Google Sites and using HTML code in your Blogger blog 😀
Happy blogging!
Heather 😀
Past articles about how to add a post signature:
- To all new posts (leaving the other ones alone as they may have an old signature design already).
- Manually adding one when you want to (and not have it appear on every existing or new post). Using the HTML method and Copy Link (instead of the Properties option) prevents new images begin loaded to your Picasa Web Album (which is where Blogger stores all images being inserted to your blog posts and sidebars).



thanks buddy not all steps i have taken 1 tip from you but amazing thanks i have successfully make my own sig on each post.
Heather,
Thanks so much for this clear and accurate tutorial! I am new to Blogger and am having a lot of trouble finding tutorials that work with the current dashboard. Thanks for updating yours. =) I also like how you show how to use Google Sites for storing images–I use Sites extensively but don’t have a Photobucket or Flickr account. I never thought of storing images this way.
Hi, for some reason my image is not showing up. It just appears as a little gray box (one that appears when the image can’t load). Any ideas why?
Hi Lindsey!
You may still have to edit the image path….to test it…copy the image path and then paste it into a new browser and see if it opens and is viewed. if not, then you need to tweak that path removing the characters after the .jpg or .png. Let me know 😀
Thank you Michelle!
Glad to help 😀
Google how to and found this article! Thank you SO MUCH!
Hi! My signature is far too big for the post, is there any way I can edit the size to make it a bit smaller in HTML? Thanks so much fro a great blog:)
Thanks so much…just saved me a lot of time trying to figure this out myself!! 🙂
Thanks so much it worked perfectly!
http://creativeelementaryschoolcounselor.blogspot.com/
Can’t thank you enough.I am learning so much from your blog!
I think is very helpful, but the problem is that I can’t find “post-footer-line-1” in my HTML. I only find this:
.post-footer {
margin: 20px -2px 0;
padding: 5px 10px;
and this:
Please can you help me?
Thank you.
Thanks for your good website and for sharing your experiences…
Anyone got any idea how you centralise the sig?
You need to click on the Expand Widgets check box at the top when you get to Edit HTML screen. Only then when you search will you find the post-footer-line code.
heather 😀
Worked very nicely using photobucket. You can also make the image linkable with Image Goes Here. Just like the image you have to use single quotes.
But how do you hide it from posts on the “homepage” that you dictate with jump break (to view more)? The way its done here means that it shows up at every single footer no matter what’s in the post itself.
Thanks for this great tutorial!
I tried it, but it only showed when I viewed my page with my cellphone, not on my computer.
LOVE your site! Thanks for making it easy to understand.