Have you ever wanted to have the same signature to appear at the bottom of every blog post so you don't manually have to do it? YES!!!! And now you can do it without much code and messing with the Editor!
In my previous tutorials, there's a lot of coding involved in getting this to work (and it does work), but those who have WordPress blogs can breathe a little easier with the use of a plugin called WP Post Signature! NOTE: Click here for my tutorials for Blogger, TypePad, and WordPress.com (free WordPress).
- So…for those using WordPress…go to your Dashboard, Plugins, and Add New.
- In the Search box, enter WP Post Signature.
- When it finds it, click Install.
- Then click to Activate it.
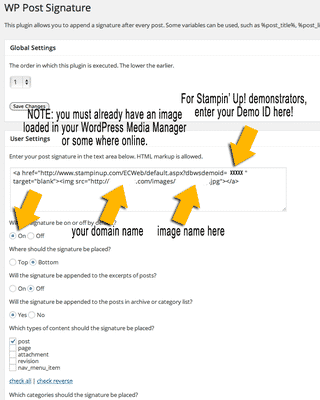
Next, to modify the settings and add the code that will then be placed at the end of each post. If you want an image signature, you have to first load that image to your Media Manager. Click Edit, and then select and use that Image URL (you'll see below where to put it).
- To edit your new plugin, go to the Dashboard, then Settings, then WP Post Signature.
- Enter 1 in the 1st option and Save Changes. This will put your signature ABOVE the LinkWithin widget that many paper crafters use.
- Then in the section below, set it to ON and at the bottom of your posts.
- Add the HTML code you want to use – such as the code for a shop online button and linking it to your website. Or simply enter the text you want to appear at the bottom of each post.
- When you're done, save changes.

For more tutorials (video and PDF) on building your WordPress site, join us at Stamping and Blogging! We have a ton of videos including how to create post and pages, add sidebar items, edit HTML code like that used here, and so much more!

