 Now that you have taken some time to categorize your post, including going back into older posts and adding them (called Labels in Blogger, Categories in TypePad and WordPress); you can now change the way you use them and change the way they appear on your blog!
As you continue to blog, your list may grow so quickly that it may take up so much room in your sidebar that it may not be so easy for your customers/visitors to find what they are looking for. So, there are a few ways you can create dropdown boxes in your sidebar.
Use Dropdowns
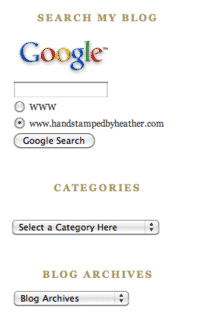
- You can create ONE DROPDOWN BOX that contains all the categories. This greatly reduces the amount of space the huge list used to take up in your sidebar. I use this on my personal stamping blog, www.HandStampedByHeather.com. Look in the right column, CATEGORIES (shown in the image to the right). This is option we will discuss in this post using Blogger, TypePad and WordPress.
- Create MULTIPLE DROPDOWN BOXES to point to Categories or pages on your blog. This option is what we’ll discuss in the next Reorganize Your Blog SERIES post.
- Create a DROPDOWN MENU (navigation bar). My pal, Sandi MacIver has a dropdown menu in her nav bar but for Catalogs and Products. You could use a similar technique for a list of categories. This topic will be discussed later in this Reorganize Your Blog SERIES of posts, as we’ll use a dropdown menu for many reasons and to point to different areas of your blog (categories, posts, pages, etc.).
Creating a Dropdown for Categories in WordPress
Out of all three platforms, WordPress has the easiest method in converting your Categories list to a Dropdown menu. So we’ll discuss it first.
- From the Dashboard, click on Appearance, then Widgets.
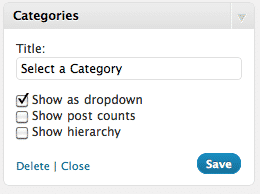
- If you don’t already have the Categories widget added to your blog, click and drag the available widget to one of your sidebars.
- Then you may click on the dropdown arrow to the right of the Categories Title and the properties appear.
- Click on “Show as dropdown”.
- Click Save.
- Click Close.
- You’re done.
Creating a Dropdown for Categories in Blogger
This is not as easy as the WordPress method but much easier than the TypePad solution, so we’ll discuss this method next. It involves editing HTML code.
- From the Dashboard, click on Design,
- First, be sure you have the Labels gadget added to your blog’s sidebar and drag and drop where you want the list/dropdown located.
-
- To add Labels to your sidebar, click on Add a Gadget.
- Then select Labels.
- Save.
- Drag and drop where you want it in the sidebar.
- Save again.
- Now, we’ll make the necessary changes in HTML.
- Click on the Edit HTML tab.
- Back up your current template in case of error. Under Backup / Restore Template, click on Download Full Template.
- Now you’re ready to modify the code in the large text box under Edit Template.
- You do NOT need to click Expand Widgets. You can use CTRL + F (Command + F on a Mac) to use a Find and search for Label1 looking for the code:
<b:widget id=’Label1′ locked=’false’ title=’Labels’ type=’Label’/>
- Then replace that one line of code with this set:
<b:widget id=’Label1′ locked=’false’ title=’Categories’ type=’Label’>
<b:includable id=’main’>
<b:if cond=’data:title’>
<h2><data:title/></h2>
</b:if>
<div class=’widget-content’><br/>
<select onchange=’location=this.options[this.selectedIndex].value;’ style=’width:180px;’>
<option>Select a Category Here</option>
<b:loop values=’data:labels’ var=’label’>
<option expr:value=’data:label.url’><data:label.name/>
(<data:label.count/>)
</option>
</b:loop>
</select>
</div>
</b:includable>
</b:widget>
- Then click Save Template.
- You’re Done.
Creating a Dropdown for Categories in TypePad
Although many of us enjoy TypePad, it is the most difficult to convert to a dropdown box for Categories. Unless you are using Advanced Templates (which is not recommended for most users who like a visual layout of their blog (Design->Content) and who are not familiar or want to deal with code), it is a manual process which is not hard necessarily but very time consuming depending on your list of categories. So, you will either be using a Notes Typelist or modifying code in your Advanced Templates module.
Using a Notes Typelist
Create a Notes Typelist and copy and paste this code and you will get the dropdown box listed in one of my test blogs: http://heatherporto.typepad.com/testing2
<html>
<body>
<form>
<select onchange=’location=this.value;’>
<option value=http://heatherporto.typepad.com/testing2>
Select By Category</option>
<option value=http://heatherporto.typepad.com/testing2/family/>
Family</option>
</select>
</form>
</body>
</html>
You would have to continue each list entering new values respectively for each month/year and for each category; and of course with a reference to your TypePad blog, not my testing blog! Basically you have to create and modify the “value” segments of the lines of code:
<option value=http://heatherporto.typepad.com/testing2>
Select By Category</option>
<option value=http://heatherporto.typepad.com/testing2/family/>
Family</option>
You may have to experiment a little bit but we’ll be covering this type of coding in my HTML for Bloggers webinar! Note: I am wrapping up my book this week and next (and then it’s done to be published in March). I will then release the webinar schedule where HTML for Bloggers, Photosohp for Bloggers, and Facebook/Twitter Integration are the first to be delivered!
Using Advanced Templates
One way to accomplish this functionality is to switch and convert to Advanced Templates. However, this choice should be not be one that you just jump to since it does change the way you maintain your blog and does require the $14.95 USD Pro Unlimited package in Typepad. And there is no easy conversion, your blog will need to be recoded from scratch pretty much using HTML/CSS and Typepad Module codes.
I have done these conversions for $75-$100 depending on the complexity of the blog’s layout and would be happy to help. But again, I do not recommend Advanced Templates for most bloggers.
- Go to Design,
- then Templates,
- and then open your Main Index module or you may have a Sidebar module if you have been using Advanced Templates for a while.
Note: if you are modifying the Main Index Template, then you converted to Advanced Templates after TypePad removed the Convert To Advanced Templates option and you now have to modify the Main Index Template, as well as 5 others! Contact me if you are using Advanced Templates and need more info.
Search the module for this line of code:
<!–#include virtual=”/lists/tph_subscribe/module.inc”–>
And replace with:
<div>
<ul>
<form>
<select style=”width:150px; margin: 0px 0px 10px 5px; font-family: verdana, Arial, sans-serif; font-size: 11px;” onChange=”document.location=options[selectedIndex].value;”>
<option value=””>archives by category</option>
<MTArchiveList archive_type=”Category”>
<option value=”<$MTArchiveLink$>”><$MTArchiveTitle$> (<$MTArchiveCount$>)</option>
</MTArchiveList>
</select>
</form>
</ul>
</div>
To view a sample, see another one of my development blogs (testing area):
http://heatherporto.typepad.com/testing/
I’m hope you are enjoying the Reorganize Your Blog SERIES! More coming soon…multiple dropdown boxes for Categories is up next. Stay tuned….
Happy Blogging!
Heather Wright-Porto
www.BlogsByHeather.com


thanks heather for the codes! I really appreciates!
Hi There,
Well I did as you directed for blogger but I didn’t save the change as I am extremely nervous. I wanted to do a drop down menu for my tutorials for sale and not categories. What am I doing wrong? Thanks!
Hi Teresa!
You are not doing anything wrong. These are specific instructions just to work on a list of categories (or Labels in Blogger). However, my next post, working on it now, will show you how to create your own dropdown lists for anything you’d like.
Is this will work in any language? I have tried but did not find the first code to delete?
Thanks
Basically you are looking for the word “Label1”. You can go to Google Translate to see how that translates into your language and then search for that word 😀
Thanks so much! Looks so much better:D