As promised I would be sharing you how-to articles on how to install Google Analytics on your blog!
Yes, I will be providing a tutorial for TypePad and WordPress too, but this first article is on Blogger.
Google Analytics is considered one of the top and leading visitor tracking tools out there and FREE!
First you need to go to https://www.google.com/analytics and either sign in with an existing Google account or create a new one.
Next, you'll find this screen where it shows you the three main steps in adding Google Analytics to your site.
Click Sign Up!
Set up Google Analytics Account
On the next screen you'll enter one account name. You will enter your first site, as you may later add more sites to track from this one account. You do not need to create multiple accounts.
So enter your desired account name, your first site, and your time zone. Then you may or may not wish to share your Analytics data. In my example, I chose not to share my data.
Read and accept the terms (if you do accept them and wish to continue).
Click to Create Account.
After clicking Create Account you'll get a green "Success" button at the top and then come to a next screen below.
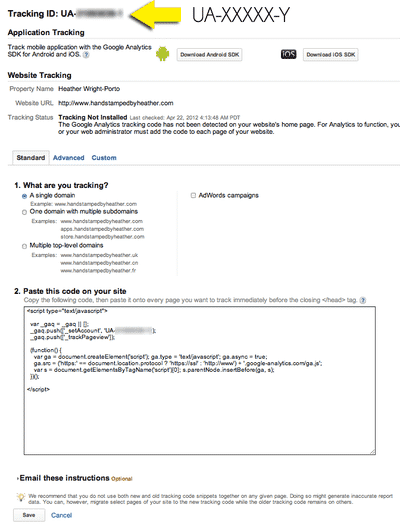
You will note your UA Google Analytics ID at the top. You'll use that later on.
Install Google Analytics in Blogger
Many applications now just have a box where you can enter in your Google Analytics UA Number as Blogger does.
Enter Google Analytics UA Number
- From the dashboard go to Settings, and under the Basic tab you can find the Google Analytics box as highlighted below.
- Or if you are using the new Blogger interface as I am, you will find it under Settings, then Other, as shown below.
- Remember to click Save.
Editing the HTML Code
If afterwords you are prompted that you must enter the tracking code, this requires your to edit the HTML.
- In the old Blogger Interface you would go to Design and then Edit HTML.
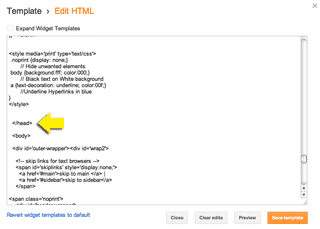
- In the new Blogger interface, you can go to Template, Edit HTML and click Yes to Proceed.
You need to find </head> so you can either scroll down the code or do a CTRL + F to do a Find.
- you have to select the HTML code from the Step 2: Paste This Code On Your Site in your Google Analytics screen shown.
- Then Paste the code above the </head> line of code.
- Click to Save Template or Save depending on which Blogger interface you're using.
Additional Tutorial: If you want to instead use this tutorial, click here to learn more. Then be sure you go to Edit HTML from Design tab, and use CTRL+F to find </head> to paste in the code above that line.
Summary
If you exit and need to login again, go to http://www.Google.com/Analytics and login.
You need to wait a few days before your Analytics will begin populating with traffic to your site!
In Google Analytics
- Click Save after you've installed the Google Analytics ID in Blogger settings.
- You will notice under Website Tracking, the Tracking Status will change to "Receiving Data" so you are good to go!
Getting Started with Google Analytics
After your account is setup and you have it installed on your site and "receiving data", then you may click Home, Standard Reporting or Custom Reporting to begin viewing traffic details to your site.
Here are some links to get you started with Google Analytics:
- Features of Google Analytics
- Google Analytics Help Center
- How to Analyze Your Traffic
- About SEO and Google Analytics
- In-Page Analytics
- YouTube Videos on Using Google Analytics
- Keep updated and follow the Google Analytics Blog
Next will be how to add Google Analytics to TypePad and then another blogging tutorial on WordPress! Stay tuned….
Happy blogging!
Heather Wright-Porto
www.BlogsByHeather.com


Thank you so much for this tutorial! You made it simple and easy for me to install Google Analytics on my blog 🙂
thank you ! For some reason I have been banging my head on the wall with GA for years & this is finally something (even) I can do
I think I did something wrong. I was trying the old way of copying the code into each blog then deleted that because I found your instructions. Tried that now the Tracking Status keeps saying not complete and that I have to copy the code on each page.
Thank you again Heather! Your instructions are clear and concise and always work great.
I followed the instructions but it’s still saying “Tracking Not Installed”. Any ideas?
I did what you said in the instructions, but it says “The Google Analytics tracking code has not been detected on your website’s home page. For Analytics to function, you or your web administrator must add the code to each page of your website.” What should I do?
Hi “Frustrated in GA”. I have updated this article again so it includes the tracking code and where it need to be inserted. Best wishes, Heather 😀
Hi Kendall and Vlad!
Although for some you no longer need to add the “code”, I have updated this article again to include instructions on adding the HTML code to your template (Edit HTML) so it should now work for you! Keep me posted,
heather 😀
Hi Vlad!
I just updated this article so you should be good to go with where and how to add the “code” so your tracking in Google Analytics can work 😀
I followed and did everything right but it still says “Tracking Not Installed”
Happy Mommy Adventures
Did you also put in the “code” in the Edit HTML and click Save?
Did you refresh the Google Analytics page.
Are you still experiencing problems?
Thank you very much 🙂
Thank you so much! This would have been impossible to set up without your help. You are so awesome!!!
xo Jaime
thank you for this! i wasted so much time trying to figure this out already.
Thank you so much! Your tutorial just made my day easier!
Ugh…still unable to install google analytics. You would think it wouldn’t be so hard considering I’m using blogger.
Hi, This is awesome! Thank you. I entered my UA code and was not prompted to enter the tracking code, that requires an edit to HTML so am I done? I couldn’t ever find my tracking code anyway… so I hope this is it.
And yet, Google Analytics seems to provide just general stats, not a record of each visit, where it was from and how they got there. Site Meter still seems a better bet for that. And I see you have a Site Meter on this very blog! So maybe you agree?
Thanks, I found this incredibly useful.
Hi, Followed your instructions about adding the code in the html section. But after I did that and checked a preview
I’m getting this under my Recent Post and Followers sections a message that says: “We’re sorry…unable to handle your request….”
Did I do something wrong…Does the code have to be there? Thanks
I like sitemeter but Google Analytics can give more info about the referring sites, tracks page views and counts visits. here are some other tools too:
https://www.blogsbyheather.com/2012/08/101-blogging-tips-tip-9-visitor-tracking.html
It’s good to use many different tracking tools as they all provide similar but different information 😀
Heather 😀
Thank you very much for the tutorial.
Is it need to edit html code after type in the analytics code?
Thanks very much this post is very informative i have implemeted it on my Love Angels Blogs!!!
Thanks for the great tutorial! It was simple and easy to follow. I had GA installed in no time.
I had avoided installing Google Analytics for months, as last time I Googled how to do it sounded way too complicated to bother with! However this was so easy and simple, and I’m so happy I found this site! Thanks so much!
Thank you!
thanks so much i really love your toturial